Wednesday, 30 April 2014

A-Z Simple Living: Z = Zero


I recently came across the concept of resetting your life to Zero, and I thought it was a perfect topic for my final blog post for the A-Z of Simple Living challenge. It has been so much fun coming up with posts every day based around my simple living hobby, and I now have a wealth of information to refer back to. Thank you to all those around the world who popped in to visit...you are always welcome.

Resetting your life to Zero is basically taking everything back to being as uncomplicated as possible, in order to feel peace, and to focus on the next day or week of your life. Here are a few examples:

1. Resetting Your Home to Zero

Resetting your home involves returning it to it's 'resting' state. That state where you know everything is up to date. Once the dishes are done, everything is put away, the washing is up to date and the floors are mopped or vacuumed for example, then you can turn your focus to other things. I try and do this before going to bed every night, and before I leave for work in the morning. It does not always get done, but I do feel so much better, and more relaxed, when it is. By Sunday night I like to have the larger jobs such as the clothes folded and put away, in order to start off the week refreshed and organised. I realise that this is what I was doing on my holidays, getting my home back to zero.
2. Resetting Your Inbox to Zero
This is something I get slack with and my hotmail email account is the worst...full of pages of newsletters that I don't even read, so I have unsubscribed to anything that is not of interest, and now I am not missing so many emails. I have also made better use of folders to find emails quickly. Uncluttering my inbox has reset it back to Zero, and I now don't worry that I may miss something important.
3. Resetting Yourself to Zero
The fact that I chose mindfulness for my word this year is a wonderful thing because it fits so neatly within this concept of resetting to zero. By remembering to focus on the here and now, and appreciating and celebrating my life, I find that my internal clutter is reducing. I am learning to rest and take time for myself in order to recalibrate and figure out where to go next, what project to focus on, or what book to settle in with, comfortable in knowing that most things in my life are in order...it is taking time though, and I just hope that my work does not spiral out of control again because that took a while to recover from. 


Image Source

Patricia from Brainy Woman says that the first thoughts that come into your mind within the first five minutes of the day are the ones that create your day, so start with positive ones. Waking up with your first thought of being thankful for such a wonderful day, will ensure having a good day. She says that starting from zero means returning to your zero state where nothing exists but everything is possible...and I love that concept.

Image Source

Colin from Exile Lifestyle says that resetting to Zero helps you to focus and think clearly when all the little stresses of the day are neutralized. It’s about looking at who you are, what you want, and in what direction you’re currently moving. It’s about being happier and more fulfilled, and achieving both goals by giving yourself the chance to change direction quickly, and with as few negative consequences as possible, should such a change be warranted.
Do you try and start from zero everyday? What other parts of your life do you set back to zero?


Tuesday, 29 April 2014

A-Z Simple Living: Y = Yoghurt


I make my own home-made yoghurt every second weekend, and if you want something simple to start off your simple living journey, then I urge you to give it a go. It is so easy to make and costs less than half what you pay in the stores. I find that my batch keeps for two weeks in the fridge and I use the last of it to make the next batch, so I always have a supply.


I use a recipe from Rhonda at Down to Earth as it turns out perfectly every time, and I now make it with skim milk to reduce the calories...and it still comes out creamy, even with standard Aldi milk.

The important thing with yoghurt, as with cheese making and preserving, is to make it in sterile conditions and store in a sterile container. Rhonda suggests heating the milk even if it is pasteurised to ensure all bacteria is removed from the milk. This will help the production of the good bacteria, which is introduced via a culture or starter, in this case existing yoghurt.

EQUIPMENT REQUIRED

  • Sterilised jar/s - approx 1.5L
  • Whisk 
  • Spoon 
  • Small saucepan 
  • Two towels
INGREDIENTS
  • 1.4 litres/quarts milk - this can be full cream, skim, UHT, powdered 
  • 2 tablespoons good quality natural yoghurt with live cultures and no added gelatine
  • 2 tablespoons powdered milk


METHOD
  • Sterlise the jar, lid, whisk and spoon in a pan of boiling water or in the oven for ten minutes. 
  • Pour the milk into the saucepan.
  • Add the milk powder and whisk it in making sure the milk powder is completely dissolved. 
  • Heat to 90C/195F - I have a cheese thermometer that sits on the side of the pan but the first time I made this cheese I just held a meat thermometer in the milk, which works just as well - make sure you sterilse it too though.

  • Take the milk off the heat and let the saucepan sit in a sink, with about 10cm of cold water. This will help cool down the milk quickly.
  • When the milk reaches about 45C/113F - but no higher than 50C/122F  - add two tablespoons of yoghurt and whisk in thoroughly. 


  • Add the yoghurt to the jar/jars and seal the lid. I use three pasta sauce jars which fit nicely in my fridge.
  • Wrap the jar/jars in two towels, to make an insulated parcel.
  • Let this sit on the bench in a warm spot, away from drafts - I usually prepare my yoghurt late morning and leave it on the bench all afternoon.
  • Later in the afternoon, heat the oven up for about 5 minutes, then turn off the heat.
  • Place the parcel in the oven and leave it there, untouched, till the next morning.


Beautiful fresh natural yoghurt for breakfast...now how good is that. I enjoy the taste of natural yoghurt but my kids like it flavoured and sweetened so I just add a little grated palm sugar and mix in whatever fruit or fruit puree I may have on hand. Apparently jam mixed in is a quick way to convert it. I also use this yoghurt in the place of sour cream or cream in recipes or meals.

Every so often I will further process the yoghurt and make creamy Greek yoghurt. This involves straining the natural yoghurt through your muslin or cheesecloth in the fridge overnight.


You don't end up with as much yoghurt (about half the quantity), but it is beautiful and creamy and not at all sour.


So, there you have it. How easy is that? Takes about ten minutes to prepare, and is a wonderful additive free product for your family....full of natural probitics! Plus my kids eat tons of it...so the dollar savings are considerable.

Do you make your own yoghurt? 

Monday, 28 April 2014

A-Z Simple Living: X = Xeriscaping


Xeriscaping is landscaping and gardening that reduces or eliminates the need for watering and is particularly viable in regions that do not have easily accessible, plentiful, or reliable supplies of fresh water. It is gaining in popularity as an alternative to various types of traditional gardening.

Image Source

There is no single way to design a successful xeriscape landscape. Basically you need to work with the natural features of your landscape and Xeriscape Landscaping suggest that you consider the following issues:
  • Which areas of your garden have shade throughout the day?
  • Which areas of your garden have shade during part of the day?
  • How do your shade patterns change with the seasons?
  • Which areas of your garden are open slopes that do not collect water?
  • Which areas of your garden are flat and collect some rainwater?
  • Which areas of your garden have natural water collection (low areas or areas with natural borders that facilitate water collection)?
The more you can make use of the natural, existing qualities of your terrain, the less reworking you will need to do.  Doing radical changes to your terrain will obviously result in high labor and materials costs. 

Image Source

Xeriscape plants will come in a range of water requirements and should be matched to suit your landscape...a good gardening store should be able to give you advice. Or you can look around your neighbourhood. I have always been inspired by this garden (below) just down the road from me, which always has colour and is never watered, even in drought.


Here are some additional tips for your xeriscape from The Jurassic Garden, who also have photographs of plants to include in your xeriscape garden, such as cycads, aloe and succulents:

  1. Use Mulch: Adding a thick layer of mulch conserves water, keeps down weeds, and protects your plants from extremes of summer heat and winter cold. Apply at least 3 inches for your drought-tolerant plants’ best benefit.
  2. Water deeply but infrequently: This encourages plants to push deeper roots, and be self-sustaining for longer.
  3. Create Different Watering Zones: Drought resistant plant species need less water, and should get shorter watering times, if you have an automatic irrigation system.
  4. Get by with as little lawn as possible: Turf grass is popular, but is a big water hog. Explore more drought resistant lawn types.
  5. Recycle rainwater if you can: Not only does this save on you water bill, rain water is much less alkaline, so your plants will like it much more. 

So, it's common sense really, but I have been known to plant inappropriate plants in my garden. I now think about it before planting, and although I had never heard of xeriscaping before, experience has taught me what works well here and what doesn't - I also have to take into account plants that will be okay underwater for a few days :)

Do you xeriscape, even though you'd (maybe) not heard of it before?

Saturday, 26 April 2014

A-Z Simple Living: W = Water


My father once told me I am a true water sign, being born under the star sign of Cancer. He said it when I was relaying a story to him about a house I rented before I married Paul. One weekend while I was away, a dripping tap in the kitchen caused flooding and ruined the drawers and benchtops. When he said it, I automatically thought of the screaming when they tried to put me in the pool for swimming lessons, and the time I nearly drowned when someone jumped on me while I was underwater...yes I am a true water sign, if you believe in that kind of thing.


And actually, its hard not to believe it because all of us that live in this house are water signs...and we live in a house that floods. Funny how things work like that sometimes isn't it? You could almost believe we are attracting the water somehow. Silly stuff, but sometimes it helps to look at things in a different way and the last point above kind of sums up my crazy logic :)


Anyway, that's not the reason for writing this post about water. In terms of my simple living lifestyle, water is a crucial factor...to grow my own produce, especially because I do not live in town. We rely on rainfall to fill our tanks and when they run dry, we use our bore (decent, clean water) to refill them, but only if we have to.
These are some of the measures we take to ensure that we are conserving our water usage:

1. We installed water saver shower heads to both showers
2. Baths are restricted during the dry season
3. When it rains I put all available containers (saucepans and all) out on the verandah to catch the rainfall
4. When we boil vegetables or eggs, we let the water cool down and then use it on the pot plants
5. I water my gardens directly from my bore - this avoids the cost of double-pumping
6. We only run the dishwasher when it is full
7. We replaced our washing machine with a water efficient front loader
8. We wash our cars in town

Image Source

These are all good things and many of them also save power, but I have worked out that there are so many more things that I could be doing and that I will be investigating/investing in:

1. Water Saving Gardens - wicking beds
2. More water tanks to catch the run-off from our sheds
3. Installing a drip irrigation system to water my plants without wastage
4. Using permaculture principles such as the creation of swales which use water effectively
5. Investigate the use of grey water in the garden

So, even though I have some measures in place to conserve water, there are still so many ways I can save even more. Save Water is a great site if you are looking for ideas.

Do you think about saving water? What steps have you taken, and what tips can you provide me?


Friday, 25 April 2014

A-Z Simple Living: V = Variety


The key for me, with embarking on a course towards simple living, is to embrace a variety of different tasks. I usually set aside certain days for the longer tasks, and make lists on the weekend of things I want to make or do during the week and the following weekend, to ensure that I am on track with my goals and that I have the right ingredients or components for my projects. I am also easily bored or side-tracked so I need the variety to keep me going. The best way I can explain this is to share some of the things I have done this week, whilst on holidays.


I spent a day making three home-made soups, using stock I made from scratch. This is the beef one.


I planted a grape vine to climb up to our upstairs verandah and create a nice attractive canopy for downstairs...hopefully one day anyway :)


I got sick of covering my dining table with vinyl tablecloths that the pattern wears off after a while...


So I painted it with some spare gloss paint I had hanging around!


We had another close call with mother nature and checked out the creek...which did not go over.


I marvelled at the wonder of our beautiful green lawns.


I finally identified my mystery garden funghi - it is commonly called Birds Nest Funghi and is not harmful to my soil. Some say it is actually beneficial.


I made some pumpkin muffins with some of our leftover pumpkin...


...as well as a pumpkin loaf.


I attempted hot cross buns which turned out more like rolls...but the kids ate them anyway.


We lit a huge bonfire while all the kids were over.


I stopped to photograph these Kangaroos which were watching us from the side of the road one day.


I went to an amazing Permaculture Garden as part of the Noosa Permaculture Group...


....and learnt so so much about how to garden using all of the elements in harmony with one another.


I proudly took a tray of pumpkin bread made with my own pumpkins and smeared with my home-made cream cheese, to our Easter lunch at the in-laws.


I made my first hard cheese. This is the beginning of a cheddar which should be ready in about 4 weeks.


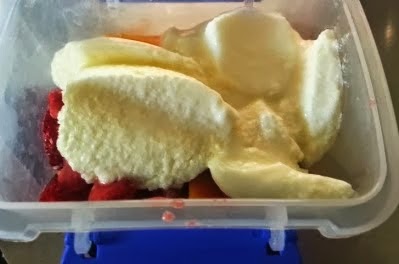
I made Ricotta from the leftover whey.


This is my Chilli jam, made from chillies I was given.


I prepared frozen meals for my lunches when I go back to work next week...yucky thought :)


I planted out my seedlings...


...and prepared all my garden beds for more.


I even rearranged the verandah by moving my herbs under cover.

So, this is just a snapshot of a week of my simple living life. It's not all about doing things all the time, I did relax and spent quality time with my kids and family too...plus did a lot of things to make my life easier when I go back to work. It's just a matter of a little forward planning, and for me, heaps of variety :)

Do you plan projects like I do? You should see my to-do list...it's very long, what about yours?


Thursday, 24 April 2014

A-Z Simple Living: U = Upcycle


Upcycling is the reuse of discarded objects or material in such a way as to create a product of higher quality or value than the original. Rather than bore you with heaps of theory today, I thought I would just share some images of cute and clever upcycling ideas I found on Pinterest:


Image Source


Image Source

Image Source


Source Unknown


Image Source


Image Source

Image Source


Image Source

Image Source


Image Source
So, there are no limits to upcycling, just as there are no limits to one's imagination. I certainly have a few (well, more than a few) wine bottles that could be put to good use... and I love the idea for the pot rack. I have actually seen one using a bike wheel before, and I just happen to have one of those...now I just need a handyman :)

Have you upcycled anything of note? I would love to hear of any ideas. I mainly re-use items but haven't got really creative yet, unless you count the use of old metal bedheads (my boys tend to break beds) as trellis for my beans.


Related Posts Plugin for WordPress, Blogger...